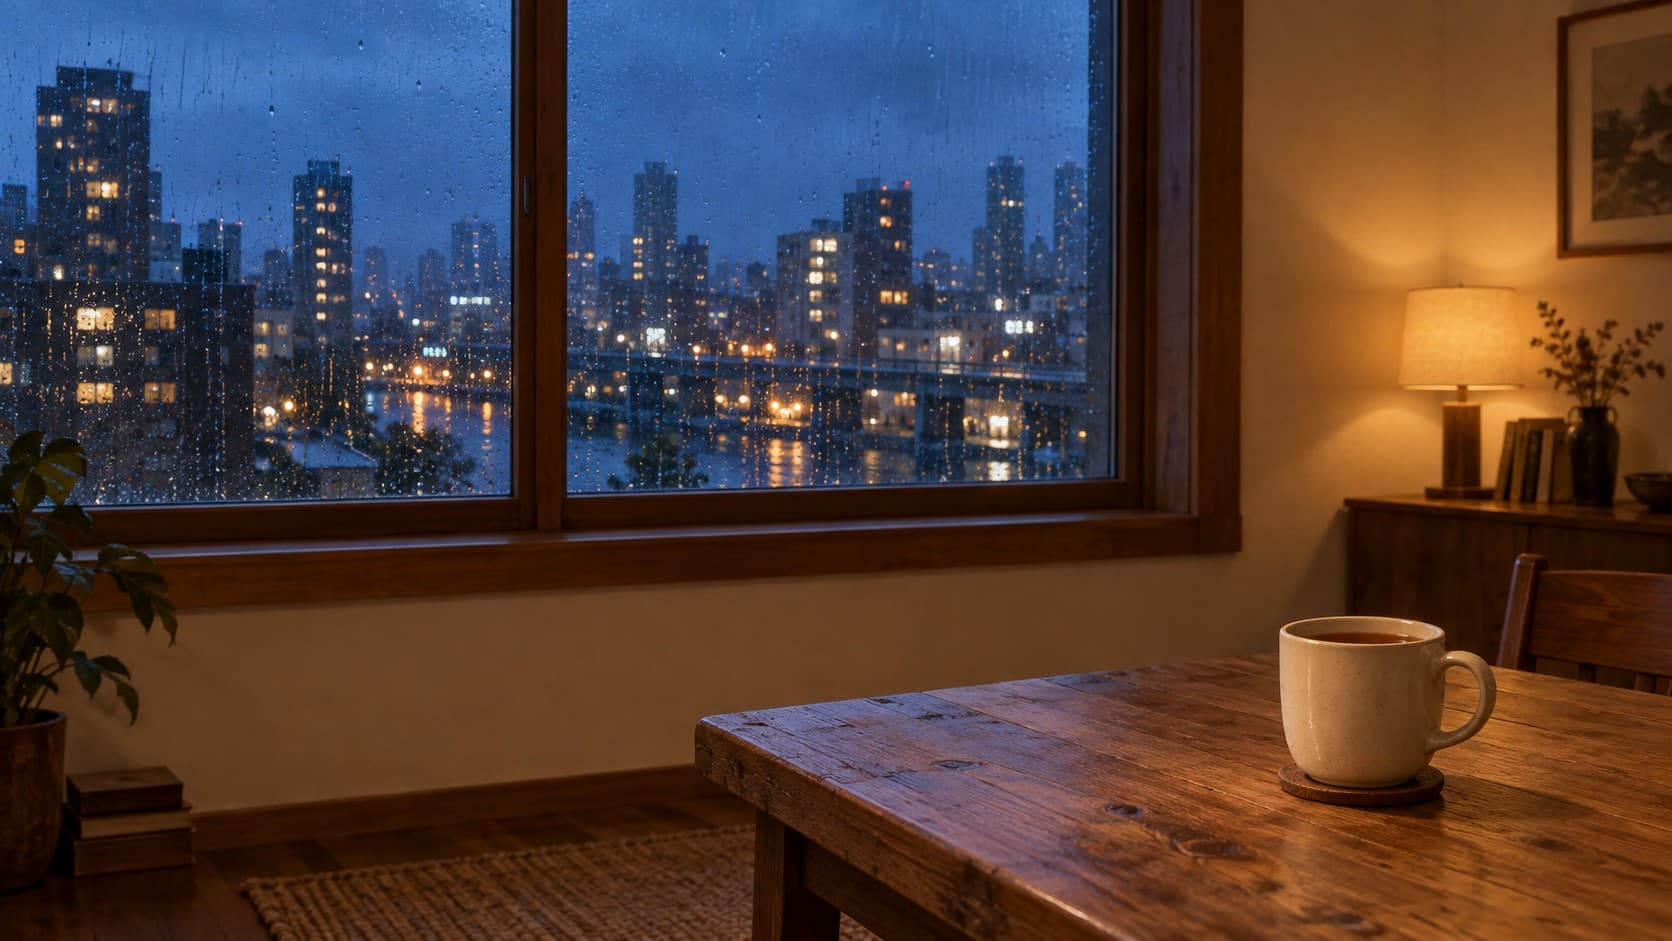
Rain moves outside a window. Steam rises from a cup. The desk and lamp stay still. A small amount of motion can change the atmosphere of a scene without turning every object into an animation. This is a cinemagraph: a mostly static image with a limited area of looping movement.
The method in this guide uses code to add effects over an existing image. It does not ask a video-generation model to redraw the whole scene. You can start by describing the result to Claude rather than writing the code yourself. Your job is to choose the moving area, inspect its boundaries, and check the finished loop.
The starting point is a public article by AI artist Shironagasu, who describes using Claude Opus 5.5 to write and run Python and OpenCV code for ten-second loops. We have not copied the artist’s images or videos. The images below are new instructional examples. Our working video was composited locally with Node.js, Sharp, and FFmpeg. It is not evidence that we reproduced the same result in Claude’s consumer chat interface.
See the effect first
This ten-second demonstration adds falling rain inside the window panes and a narrow steam plume above the cup. Press play and let it repeat twice. There is no audio. The example uses neither a camera move nor a change in the furniture’s shape.
Download the MP4 · Original practice PNG
 The original practice image: a rainy city window and a cup, with clearly separated areas for added motion.View original
The principle: original, mask, effect
Think of three sheets placed over one another. The first is the original image. The second is a mask, which determines where an effect is allowed. The third contains the moving effect. A mask works like a stencil: motion shows through the opening, while the rest of the image remains outside that effect.
 An exploded 3D concept view of the original, mask, and effect layers. The spacing explains the relationship; the actual compositing happens on flat images.View original
The diagram does not mean that the photograph has been reconstructed as a 3D room. Nor does it reveal hidden surfaces behind objects. In the actual process, equally sized two-dimensional images are combined into a frame. Producing and playing a sequence of frames creates the video.
“No video-generation AI” needs a careful reading. Claude still participates as an AI that interprets your request and writes code. What is excluded is a generative video model that synthesizes the scene frame by frame. The base image in this guide was itself newly generated with GPT image generation.
What you need
Start with a PNG or JPEG that you are entitled to use. Choose a scene with a clear window, water surface, or cup rather than a complicated moving character. Keep an untouched copy. If you resize a working copy, save it under a different name.
Claude’s official help page describes code execution and file creation on web, desktop, and mobile. For a personal account, check Settings → Capabilities → Code execution and file creation. The wording may vary with the interface language. In a managed account, the organization can restrict the feature or package installation. Follow its policy instead of loosening security settings on your own.
Understanding an uploaded picture is not the same as executing code and returning a file. If Claude only describes a method, ask it to run the code and provide the downloadable result. Availability of file creation does not guarantee that every account or tool environment can complete an MP4 export. Model access, usage limits, packages, and execution resources can all affect the outcome.
The source article names Opus 5.5. Do not assume that model is available in every account, or purchase an upgrade before testing a small example. Check whether your available model can execute code and save files first.
Step 1: choose one moving area
Begin with rain in the window. Add steam only after the rain is placed correctly. Asking for rain, blinking, wind, lighting changes, and camera movement together makes failures harder to diagnose.
A good beginner image has a visible boundary between moving and fixed areas. A rectangular window with little in front of it is easier to mask than glass covered by hair, branches, or furniture. If an object stands in front of the window, its outline must be excluded so rain does not appear over it.
Turning a head or raising a hand requires appearances that the still picture does not contain. Even blinking involves drawing eyelids and can look awkward. That is why the first example here has no people.
Step 2: attach the image and make a specific request
Open a new Claude conversation and attach the image. Claude supports image uploads including PNG and JPEG. For large files, follow the limits shown by the actual upload interface and use a smaller working copy if necessary. Check that the picture contains no confidential documents, customer information, or faces you lack permission to upload.
The following is an original practice prompt written for this guide, not a wholesale translation of the artist’s Japanese prompt:
Please make a ten-second cinemagraph from the attached image.

Do not use a generative video model to redraw the scene.
Write and run code to composite motion over the original image.

1. Add thin falling rain only inside the window glass, excluding the frame.
2. Keep the desk, cup, lamp, and wall fixed. Do not move the camera.
3. First show a colored mask preview identifying the permitted motion area.
4. After I check the mask, export a silent ten-second MP4 at 24 fps.
5. Design the rain so the transition from the end back to the start does not jump.
6. Do not overwrite the original. Include the source code with the result.

If your tools cannot execute this, say what is missing and explain
how I can run it on my computer. Do not report completion without a file.
Ten seconds at 24 fps means 240 frames. Frames per second is simply the number of pictures displayed each second. These are practice settings, not a mandatory cinemagraph standard. If processing or export fails, request a smaller three-second preview before increasing the length.
Step 3: inspect the mask before rendering
A blue rectangle over the window can look plausible while also covering the frame or plant. Inspect it first. The overlay shows where changes are allowed; it is not the finished rain effect.
 The actual demonstration mask overlay. Blue marks the inset window areas and a confined region above the cup where effects may be added.View original
Describe visible errors in ordinary language: “Keep the plant leaves at the lower left free of rain” or “Preserve the wooden divider between the panes.” You do not need to start by learning pixel coordinates. Ask for the corrected mask and a still preview before the video render.
Once the rain looks right, add a second request:
Keep the approved rain and window mask unchanged.
Add faint steam starting at the cup opening.
Let it rise slowly with a slight sideways drift.
Keep the cup body and desk fixed. Do not haze the whole window or lamp.
Show the updated permitted area and one preview frame first.
Step 4: make a loop, not just a short video
A ten-second duration does not make a seamless loop. If a raindrop is near the bottom in the last frame and abruptly appears at the top on the next frame, the restart becomes visible. The effect’s position and brightness need a repeating cycle.
 A 3D loop concept: the base scene remains the same while the effect changes phase and returns to its starting state.View original
Code can express time as a value that cycles from zero to one. Effects can then be designed so the state at zero equals the state exactly ten seconds later. An exported MP4 does not need a duplicate frame at the ten-second endpoint. The important test is the transition from its last frame into its first.
A television insert adds another task: the inserted footage needs its own start-to-end transition. Shironagasu describes fitting a video into a TV screen and compositing a mirrored, blurred version into the window reflection. Save that for a later exercise after the simple rain example. Check the rights to any inserted footage and music separately.
Step 5: check four places
Play the video through at least twice. Examine the window frame, the cup edge, the boundary of each effect, and the restart. If the motion is too faint, adjust the rain brightness or steam opacity rather than shaking the entire picture. Change one property at a time so you can see which adjustment helped.
Scroll horizontally to view a wide table.
| What you see | What to request next |
|---|---|
| Rain over the plant or window frame | Exclude those objects from the mask and show a fixed-area comparison. |
| Steam hazing the whole scene | Restrict it to a small area above the cup and reduce opacity. |
| A brightness flash at the restart | Match the effect phases and show frames on both sides of the boundary. |
| The whole image zooming or moving | Remove camera motion and whole-image transforms; lock the original composition. |
| Source code but no video file | Execute it and attach the MP4, or explain why execution is unavailable. |
“Preserve the original pixels” has a boundary. Leaving array values outside the effect untouched before encoding is not the same as decoding an MP4 and finding every pixel identical to the original PNG. Resizing, color conversion, and lossy H.264 compression can change those values. This approach can preserve the scene’s structure without promising lossless identity in an ordinary MP4.
If Claude cannot export the MP4
Ask which capability or tool is missing. Do not disable organizational safeguards or paste unfamiliar installation commands blindly. For a local fallback, tell Claude your operating system, whether Python or Node.js is installed, and whether FFmpeg is available. Request instructions for that specific environment.
Python and OpenCV are one way to handle images and masks. FFmpeg can encode the resulting frames into video. Our demonstration uses Node.js and Sharp instead. The language is not the essential part: fix the base, limit the effects, and inspect the loop.
The source below is configured for this exact practice image. On another picture, the window and cup coordinates may be wrong. It is not a general-purpose automatic object detector. Readers who can review code can keep the source and base together to inspect or reproduce this local example.
Practice JavaScript source · Original PNG · Finished MP4
If you are comfortable running local code, use a machine with Node.js and FFmpeg installed. Create an empty folder, save the source as cinemagraph.cjs and the original as base.png, then run the following commands in that folder. The first installs the image-processing package. FFmpeg must also be available from the command line. Check installation permissions on a managed computer.
npm install sharp
node cinemagraph.cjs base.png
The script writes demo.mp4, mask images, and check files into its folder. Existing result files with the same names will be overwritten, so use an empty practice folder. If command-line execution is unfamiliar, start with Claude’s file-creation route rather than forcing this fallback.
For a first attempt, one image and one approved motion area are enough. Get the mask right, then adjust the rain, add steam, and check two consecutive loops before saving the result.
References and production scope
- Shironagasu’s cinemagraph article
- Claude: upload files
- Claude: code execution and file creation
- OpenCV: reading and writing images
- FFmpeg: image-sequence input and video output
Method reference: Shironagasu. Practice base: GPT image generation. Demonstration video and mask: Node.js/Sharp code written by Claude Sonnet 5.5, encoded with FFmpeg. 3D concept diagrams: Claude Opus 5.5 and Blender. The diagrams explain compositing; they are not the original artist’s implementation screenshots or client project records.